Creating dramatic images is all about light. Light can create power, inspiration and spiritual moments. Light creates focus, attention and drama. Needless to say without the power of light, your images can be flat and lacking of visual impact. But how do you do that when your capture is as flat as a pancake? Let’s create some light of our own!
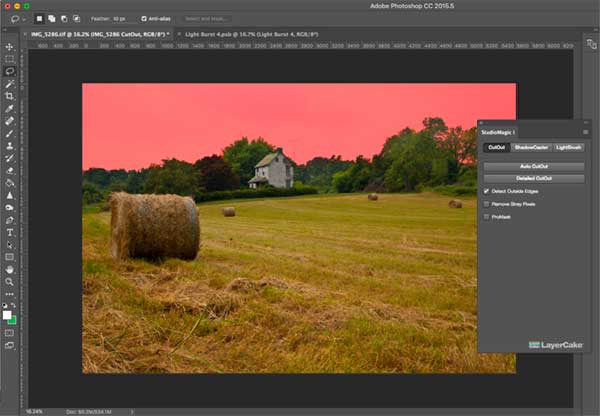
Let’s start with a landscape. I remember pulling my car over when I saw this, then climbing over a barbed wire fence and down a hill into the field. Off to the right of the image there was an amazing sky approaching and so were loud thunderclaps and lightning. I was not going to wait for the sky standing in the middle of a field like a lightning rod. I knew if I got back to my car and waited, I’d find a safe time to get out and shoot the dramatic sky without being electrocuted. Once back at my studio, the first thing I did was pull up StudioMagic 1 with it’s CutOut feature to remove the old sky.

The CutOut feature does a wonderful job of simplifying Photoshop’s refine edge settings so I don’t have decipher the myriad of options for removing something as detailed as trees from a sky. There are a lot of good applications on the market for sky removal, but I found many to be complicated. I like the CutOut tool because it works hand and hand with the best one, Photoshop’s refine edge, it just simplifies it down to something we can all understand.
Now with my sky removed, I can replace it with the one that I actually saw. Interestingly enough, summer thunderstorms in Pennsylvania come and go quick, so it’s not unusual to see the storm pass and sun breaking through in the distance. However I was not able to capture fully what I saw, the sun bursting through the treetops and spilling into the field.

This is where StudioMagic 2 comes in handy. It was created as a full compositing tool for adding important accents to your images with a few clicks of the mouse. The LightingEffex tool has a full selection of light bursts and light rays to choose from that are automatically placed into your image. In this case I chose the burst that was as close to what I saw when I photographed the sky. You can make your own light bursts if you have the time and ability, but these are a fantastic starting place and you can reshape and color them to fit your image without much problem.

Once the burst was placed, I resized and rotated it to fit the placement I desired. The original burst was too white for the overall coloration of the image, so I used the ColorMatch (local) tool in LightingEffex to warm it up to match the ambient light. It was still missing the bright center light I saw, so I selected the burst layer and duplicated it which brightened the whole burst which I didn’t want. I wanted only the hot spot to be bright and the tailing streaks to be lighter and transparent. So I rasterized the duplicate layer and erased off the streaks which reveled the lighter streaks on the layer below. If you look back now at the top original image, you can see now what a difference light can make.

I’m always looking for locations like this to place models. However without the light streaming through the window and hitting the floor as it is, it wouldn’t be much but a room full of rubble. When you shoot images like this you also want to capture that dramatic shaft of light from the window to the floor but it doesn’t always happen. Light does not have color, what you see in a light shaft is the dust in the air being lit.

Honestly being a compositor and not having the light shaft is a blessing in disguise. I want to have the option to place a light shaft on the layer behind the subject and a shaft on the layer in front to create depth. In this case I started by using StudioMagic-1 to CutOut my subject and add a shadow using ShadowCaster to match the long light cast by the window. Once I placed the shadow, I used transform to stretch it even further to match the direction and length of the light.

Using StudioMagic 2, I chose the “Smokey Dust Window light preset, which was automatically placed behind the subject. You do this by choosing the subject layer before you place the light shaft.

Light shafts and rays are starting points; rarely in interior situations like this do they fit perfectly. You will need to use the transform and distort tools to pull, stretch and distort a light shaft to fit the window shape and the length of the light. Once your shaft is sized correctly, open the light ray folder in your layer pallet, select the light ray layer and right click on it. Choose the option to rasterize it, which will give you the ability to trim the light shaft with your lasso tool to fit the shape of the window frame.

Finish off your composition by placing the same light shaft preset on the layer above the subject and using the same steps above to make it fit the window. Amazing what StudioMagic and the power of light can do for an image.

StudioMagic 1 & 2 for Photoshop are compatible with Photoshop CS 5 through CC 2015.5